Monday, December 13, 2010

Rollbacks, backups and restorations

Just a few notes on being cautious and careful with your data... because if you lose it, it's gone! Of course you can lose anything - including your keys, your dreams and/or your self-respect - but I'm thinking digital. With the ongoing conversion of "things" into binary digits - or "bits" - it's easy to overlook the potential for loss of data.

So here are some tips:

Hard drives fail, often suddenly. So make backups. To do this, firstly file your digital documents and images in logical spots (so you can find them easily without a hunt) then do a back up onto a different device. A backup can be as simple as a copy - onto a flash drive, a web drive, a DVD or an external HDD - or can be via backup software. As long as it's done - and works (ie test it occasionally) - it may save you from some grievous digital loss.

You can also make complete images of your working PC setup using "ghosting" or imaging software. A 'belts and braces' approach to data backup and recovery may include regular backups onto external hardware plus a working "image" of your PC or other device (again, stored externally). Sounds too hard? Get someone to do it for you.

Programs and drivers sometimes screw up, too: or "what works today may not work tomorrow". It could be that some data was re-written but was unintentionally distorted in the process, or a new program or OS update overwrote a critical shared file and left your older software out of action. It happens. So prepare for that with new system restore point (a link below on how to do that in XP, it's similar in most popular operating systems). That way you can "roll back" to a previous, working state. Often software (such as device driver updates) offer "rollbacks" as standard, in case of drama. But if they don't - and the new driver has killed something you rely upon - you need a restore point.

And remember to do the occasional test restoration, so that you know it works!

Using System Restore in XP - How-To Geek
Windows is well-known for having driver and .dll conflicts, as well as all sorts of software that causes problems with your computer. Luckily there’s a System restore feature that can return your computer back to a known working configuration, as long as you’ve created a restore point.

Note that some software installations will create restore points automatically, but you should run it manually before installing any questionable applications. (Or better yet, don’t install questionable applications!)


Tuesday, October 12, 2010

Webstuff: redirecting or refreshing a page of HTML

OK, you probably don't need to do this but I bet you've seen it done - you go to a website and suddenly - either immediately or a few seconds later - it redirects you to another site. It can be useful and legitimate or just plain deceitful and annoying. It all depends on the intention.

Well if your intentions are good then I'll tell you how it's done. (Or at least show you one way to do it - there's always more than one way.)


Here's some sample code:

(Like all HTML, wrap some brackets < > around it to make it work and pop it into the HEAD of your HTML page, ie after the HTML tag but before the BODY tag.)

meta http-equiv="REFRESH" content="0;url=http://www.the-domain-you-want-to-redirect-to.com"

(Don't forget to close off your "meta" tag, either.)

So what happens here?
Well the meta content="0;url=http://<b>the-domain-you-want-to-redirect-to</b>.com" http-equiv="REFRESH" is the part that actually does the redirecting or "refreshing". The number before the URL (in this case "0") tells your web browser the number of seconds to wait before redirecting to the new address (or URL). You could set this to 3 or 5 and add some explanatory text or just leave it at zero. Whatever suits your purposes.

So what do I do with this?

Just copy the code above into your HTML editor of choice - it could be Kompozer or even just Notepad - and save it as something that makes sense. It could be index.html if it's redirecting traffic off your domain or subdirectory root, which is the most likely use. Don't forget to change the domain name to the one you want to redirect to - and remember you can be explicit, right down to the page you want your visitor to land on.

For example I just put it to use in refreshing a page which contained an inline frame. I had a list of .PDF files inside the frame and if clicked they opened (that's the intention) - but you had to get out and back in again to get back to the list.

Instead of making visitors load a new page and then return I added a "Click here to refresh this list" button that simply took the browser out of that page to "refresh.html", a page that carries a "List refreshing now..." message and the above code. All it does is redirect back to the page with the inline frame - and voila! - the list has refreshed. Job done. And that's a legitimate use.

Sunday, October 10, 2010

Windows Live Messenger encounters problem on startup?

Let me guess. You just updated to the latest version of Live Messenger on Windows XP (and maybe later OS versions as well) and suddenly Live Messenger fails to proceed. It crashes with the "has encountered a problem and needs to close" message. Well I had that as well. And there's a quick fix.

Let me tell you firstly what doesn't work:
  • Reinstalling or repairing Live Messenger via "Add/Remove Programs" in "Control Panel" doesn't work
  • Uninstalling Internet Explore 8 doesn't work
  • Re-installing Internet Explorer 8 doesn't work
  • Running all manner of virus checkers doesn't work.
What does work is this fix from Microsoft: http://windowslivehelp.com/solution.aspx?solutionid=17e5dddf-4156-4725-a1a5-f3a10a76e12f

Well it worked for me, anyway. If you've tried everything else then it's up to you. Another way around this problem is to disable or remove it and use another messenger.

Saturday, September 25, 2010

Lenovo X200 downgrade to XP - part 2

Just to recap (and this applies in general to many laptops, not just Lenovo's) the steps in the downgrade from Vista to XP are (a) find the XP drivers for your hardware (in this example the Lenovo X200) and download them (b) go into the BIOS and switch your HDD to 'compatibility mode' and (c) boot up with the XP install disk. After that fine tune as needed. But that's not all as (as in life) there are alternatives.... like a call to Lenovo support to get the optional XP install disk.

Or, if you really want to do the job yourself have a read of this variation on the theme...

X200 remove Vista and install XP - Lenovo Community
Well, to install Windows XP you will need a Windows XP cd of course.

Insert the Windows XP cd in your external optical drive. Set the boot order in the BIOS so that your external optical drive is boot up before your hard disk. Reboot and follow the instructions :smileyhappy:
X200 remove Vista and install XP - Lenovo Community
However, I got "Setup did not find any hard disk drives installed in your computer" msg and asked me to quit the setup.

Seems it couldn't recongnize my harddisk
X200 remove Vista and install XP - Lenovo Community
Go into you Bios (by clicking on F1 while booting) and go to "Config" -> "Serial ATA (SATA)" and amend type to "Compatibilty" mode.

Afterwards press F10 to save and exit.

Now you should be able to install XP.

Once XP is installed, do not amend SATA type to original one, this would lead to a boot error.
X200 remove Vista and install XP - Lenovo Community
This solution works but however, I doubt it's the best solution because basically you're using old SATA drivers to run your Harddrive now. Here's what I did. You'll need another computer for this.


1. Get a Windows CD and copy the ISO to your PC.

2. Download nLite - Link

3. Download SATA Drivers - Link

4. Add Sata Drivers to your nLite Copy

5. Burn a Copy of this new Windows with Drivers.

6. You're set! No more BSOD.


Notes: The SATA drivers will unzip themselves in a folder make sure you pick the right one (9M). Instruction on how to add drivers on nLite are pretty easy; add "Single Driver" (read their forums for more stuff you can do to your installation).
X200 remove Vista and install XP - Lenovo Community
Actually, since this is a montevina based machine, you need to start with a XP cd that is SP2 or higher. You do need to go into the BIOS and change the SATA mode to Compatibility. Once you have installed Windows XP, you need to download the IMSM driver from lenovo's website. Once you have installed the IMSM package, go back into BIOS and change the SATA mode back to AHCI.


If you use an XP cd that is SP0 or SP1, you will blue screen on PCI.SYS. If you don't change the SATA mode to compatibility, you will likely blue screen with a 07B error.
X200 remove Vista and install XP - Page 2 - Lenovo Community
This is the way to do this.

change the sata controllor to compability.

install xp sp3.


after installation install the Intel matrix storage manager from the driver page http://www-307.ibm.com/pc/support/site.wss/MIGR-70477.html


reboot and change the sata controllor to ahci again. The driver will be automatically installed.

install .net from the ms site.

install system update from the lenovo site.

run system update.

after this installation there are still some drivers missing.

wifi, bluetooth, modem, and two pci devices.

http://www-307.ibm.com/pc/support/site.wss/MIGR-70477.html


but the tricky thing is the two pci devices.

for this one you need first to install this one

http://www-307.ibm.com/pc/support/site.wss/MIGR-70313.html

and after reboot you install this one

http://www-307.ibm.com/pc/support/site.wss/MIGR-70317.html


Now you can update xp with all the necessary updates. and you're done.


there are still some missing tools like active protection but this you can download from the site too!
X200 remove Vista and install XP - Page 2 - Lenovo Community
i used nLlite with my own XP Pro disk and Lenovo drivers. With no prev experience with nLite, I found it very easy. Will do this from now on.
Windows XP Clean Install
Welcome to the Windows XP Clean Install/Downgrade Guide!

I've seen a lot of threads asking how they should do a clean install and what they should do when problems occur. So I've made this thorough guide so everyone can have a stable, clean, and complete installation of Windows XP without any 3rd party software. ThinkVantage applications are considered 3rd party software. This Clean Install Guide can also help with slow boot up times (mine went from 90 seconds to 30 seconds from the moment I press the power button to a usable desktop), BSOD's (Blue-Screens-of-Death), a slow, unstable system, adware, spyware, viruses, and many more problems. The Guide can be used to install XP on any ThinkPad, e.g., T61(p), R61(i/e), X61(s), T60(p), etc.

The guide is somewhat tedious to follow due to its length. Please follow the guide carefully and make sure not to skip anything or else your computer will be incomplete. This guide can also be used as a downgrade from Vista to XP.
ThinkPad SuperGuide
Windows XP Clean Install

Method 1 (manual driver installation)

1. Backup data if necessary.
2. Use the Driver Matrices to download the following drivers/software and their respective readme's to an external storage device:


Friday, September 24, 2010

Lenovo ThinkPad project de-evolution - backtracking from Vista to XP - part 1

Is it possible - or desirable - to uninstall Vista and install XP instead on the Lenovo X200? Well let's find out.

First up we'll need to dig up the specific XP drivers and download them in advance... and then do a web search to locate any helpful advice (preferably from people who have already done this).... and interestingly Lenovo offered this downgrade as an option for new buyers, so there are genuine Lenovo disks around that will do this job. (That sounds the easiest way.)

As you'll read below downloading and installing the drivers in the correct order is your typical time-consuming trial-and-error hair-pulling business, and happily Lenovo appears to offer both a free tool to semi-automate the process (ThinkVantage System Update) and a fully-automated disk at presumably some (hopefully small) price. Read on for all of the fun....

Lenovo Support & downloads - Drivers and software - ThinkPad X200, X200s, X200 Tablet
Download the most common drivers and software
Click the category below to quickly jump to the driver you need, then click the driver's version number for more information on how to obtain the file.
Lenovo ThinkPad X200 XP Drivers | Laptop Drivers Download
Lenovo ThinkPad X200 XP Drivers
Lenovo Support & downloads - ThinkPad X200 support
Downloads and drivers
Product support

Product: ThinkPad X200 [change]
Operating system: Windows XP [change]
Lenovo Support & downloads - Drivers and software - ThinkPad X200, X200s, X200 Tablet
Download the most common drivers and software
Click the category below to quickly jump to the driver you need, then click the driver's version number for more information on how to obtain the file.
BIOS
Intel AMT
Audio
Communications - Bluetooth
Communications - Modem
Diagnostics

Hard drive
Mouse/TrackPoint
Multimedia
Networking - Ethernet
Networking - Wireless
Networking - Wireless WAN
Optical drive

Power management
Software
System utilities
ThinkVantage Technologies
Video
Windows install supplements

Notes:

* View all files for the ThinkPad X200, X200s and X200 Tablet systems.


Vista > XP Downgrade for Lenovo X200 - FlyerTalk Forums
You will need to order a system with Vista Business or Ultimate to qualify for the XP downgrade. The system will be preloaded with Vista and shipped with XP downgrade discs.

1. Yes, you will be able to switch between XP and Vista any time you want. Make sure you create the Vista recovery discs first before loading XP.
2. The XP recovery discs will recreate the Lenovo preload image with the drivers and ThinkVantage applications integrated.
3. Yes, you will need an optical drive to load the XP recovery discs and to create the Vista recovery discs. A generic external optical drive will work just as well as the Media Slice.
3. Lenovo's page on downgrading to XP should cover the important steps in your downgrade process.
Vista > XP Downgrade for Lenovo X200 - FlyerTalk Forums
I just did this with an X300. As above poster says, it comes with Vista installed and you have to get a separate CD with the XP downgrade. This is not an instll disk, rather replaces Vista on the hidden service partition and then you install from this. So any subsequent restore of the OS using Lenovo Rescue and Recovery will restore XP. To go back to Vista, you need to use a Vista CD, made with the Lenovo utility before you do the XP downgrade, to put Vista back into the hidden service partition and then do an install.

After the XP install, most drivers for my X300 worked fine, but not the WAN wireless. This was downloadable from the Lenovo website and worked fine.

I did run the machine with Vista for a while prior to making the decision to downgrade. Only one thing worked better in Vista than in XP and that was the WAN integration - Vista handles this natively, with XP one has to use either Access Connections or the software from the service provider.
Vista > XP Downgrade for Lenovo X200 - FlyerTalk Forums
I'm trying to downgrade an X200 using my customer's XP (upgrade) installation CD (w/ valid PID), and the setup is failing after all the drivers have been loaded and Windows Setup is started, with a BSOD of a "07" error (I can give the specific BSOD error number later, but it refers to New Hardware, Viruses, hard drive erros, and suggests running "chkdsk /f".

The drive is malware and error free.

Hiren's (v. 10) boots to the "Mini XP" just fine, so the optical drive is working. Setup also fails in the same way when I attempt to install with an XP OEM disk (not an "upgrade" version).

At this point, my current theory is that the X200 (Thinkpad) is so hardware-specific and picky, that only the factory installation disk for XP will work, and that any attempt at installing XP from a standard Installation CD will fail. I hope I'm wrong, and am hoping someone can tell me that they've been able to successfully install a Vista-to-XP downgrade using a standard XP Installation disk, and how they were able to do it.
Vista > XP Downgrade for Lenovo X200 - FlyerTalk Forums
The easy workaround is to go into BIOS and change SATA mode from AHCI to compatibility. That will at least get XP to boot. You can then install the Intel Matrix Storage Drivers and switch back to AHCI.

Lenovo's XP preload/recovery image already have the SATA AHCI drivers already integrated so you don't have to mess around with it. Windows Vista and 7 already has the necessary driver built-in.
Vista > XP Downgrade for Lenovo X200 - FlyerTalk Forums
Thanks to the both of you, you were exactly right. "Needing the Drivers" was something that I suspected, but I thought that the only way to get them was off the Lenovo Factory Restore Disk. But the next post mentioned
"AHCI" which is something that I have seen/recognized in various BIOS's, but never have had to deal with.

Turns out, that was the problem and the solution. I went to BIOS, flipped the switch from "AHCI" to "Compatibility" and instantly on the next reboot the Windows XP Professional (Upgrade) Installation Disk was working just fine, with no BSOD.
Vista > XP Downgrade for Lenovo X200 - FlyerTalk Forums
The Next Step: Installing ALL the X200's Drivers
I'm going to post this for posterity, on the chance it helps someone else.

I just spend almost 4 hours getting the last 5 drivers installed. First thing, you'll do well to have a USB NIC to use to connect to the internet, until you can download and install the wireless network drivers.

I'll try to keep the rest in as sequential an order as I can remember. It's 3:35 a.m., please keep that in mind...

1) I installed SP3 Standalone, a copy of which I keep on my USB thumbdrive. Good move. Dramatically reduces the number of updates you need to wade through at Windows Update.

2) Same-same for IE8. Also good to do this before going to Windows Update, but after the wireless interent (or wired, I suppose) is up and running, so that you can update IE8, and not have IE6 and all it's updates, IE7, etc... cluttering up the Update window.

3) At Lenovo's Driver download page. Someone somewhere mentioned something about installing some kind of automatic software to find, download and install all the drivers automatically. I read this after spending 3 hours trying to find them all one at a time. Unfortunately, the message I got from Lenovo when trying to run this tool was that it was only designed to be used with Windows 7. Might have been a glitch, and might work for someone else. Figured I'd mention it early so that if it does work, someone doesn't waste time.

4) The Lenovo Drivers are REAL tricky. You'd like to think it's just a matter of downloading them, saving them, launching then and the installation is automatic. No, no, NO ! Don't think that way. That thinking cost me 2 hours or more. After running the installation/set-up/whatever file, you then MUST read the "read me" text file on the Lenovo driver page, because many of the drivers have a different installation method. A few want to be run from a specific directory (usually where the set-up file dumps them), and one wants to be run from the Start > Run > cmd (command line). Many of the "set-up" files do not actually set-up and/or "install" anything (although some do), they just copy the data from where you launch the set-up to a "C:\drivers\win\..." directory. You have to go there to actually launch the REAL installation executable. Oh yeah, and at least one of the drivers needs to be installed by working backwards from Device Manager>Update Driver>Install from specific location and then aim the wizard at the driver directory that you find in the "read me" file.

MAIN POINT: Read ALL the "read me" files. It's goofy stupid, tedious and time consuming, but the only alternative is to miss this point, and keep hunting for drivers when their installation files are buried on your hard drive already.

5) Oh yeah. Do the CHIPSET drivers. Duh. They solve I think 2 of the last oddball hardwares missing drivers. SM Bus Controller, I think. I should note here that ALL the drivers I needed came from the Lenovo Driver page. Other forum's posts have people saying they can't find them there, and they are going to other sites, and using drivers for other models of laptops, etc... Completely unnecessary; everything I needed was on the Lenovo site.

6) Install the Proset utility, but don't install any of the software; it's not needed. Just the driver is good enough. Windows Wireless Configuration can run the wireless just fine; you don't need to different softwares installed, both trying to do the exact same thing. Plus, Proset is junk and WZC gives massages with happy endings.

7) Lessee, what else... Oh yeah, don't forget to install the software for the tablet stylus pen. I downloaded software directly from Waccom (Google "x200 stylus") and I think it's different than the software you would (probably, I was in a hurry and was tired of looking at Lenovo) find at Lenovo. The Waccom software was quick, and seemed more functional than what I think I remember was on the Vista O/S. Not my computer so I can't say for certain. The Wacomm software has a "calibrate" function if the stylus is 3/4" from where the mouse is (mine was). "Calibrate" fixed that in about 30 seconds.

8) Umm... Well I went crazy and used Easeus Partition Manager (used to be Magic, I think) and made an 11 Gbyte partition after all the installing, updating, drivering and fiddling was over. It's on a 320 Gbyte drive, so there's plenty of room. Then, I used XXClone to make a clone of the newly-installed Operating System with all the drivers and stuff, and all the TIME invested into it, so that if the O/S ever goes bad for whatever reason (infection, etc...) the clone can be used to re-create the newly-completed installation, so I won't have to do all of that stuff all over again. Won't help if the HD goes bad, but now that I've discovered HDD Regnerator v 1.71, HD's don't go bad for me anymore. (little hint, there....)

9) Activate your O/S before you clone it.

10) I like MyDefrag's "Monthly" data compaction and reordering script. Knocks at least 5 seconds off the boot time, and on really fragmented machines it cuts the boot time in half.

11) Disable all the crap services, like "Help & Support", "Error Reporting", "Fast User Switching", "Secondary Logon", "NetBIOS / IP Helper", "Remote Registry" and few others. Google "Black Viper" for a couple more. Switching Auto Connection Manager from Manual to Automatic will speed up the boot process by about 2 seconds, I think because it doesn't have to "manually" decide it has a wireless card and think about whether or not to make a connection (equals delay).
Vista > XP Downgrade for Lenovo X200 - FlyerTalk Forums
ThinkVantage System Update is the name. You probably downloaded version 4, which is for Windows 7 only. XP and Vista users should use version 3.14. It finds, downloads and installs all the drivers that you need. It's a great time saver.

WRT driver installation order, I always install the chipset driver first before the rest like display, network, etc. The chipset is the interconnect between CPU and all the devices, and the CPU needs to know how to access the interconnect before it can access the devices.
Vista > XP Downgrade for Lenovo X200 - FlyerTalk Forums
If your XP were tablet edition, the stylus would be supported out of the box. XP Tablet Edition was one level above Pro, and available only through OEM channels. If you run XP Pro with tablet driver, you won't have the Tablet Input Panel (TIP) and handwriting recognition. Nevertheless, the Wacom Penabled driver vastly improves on the built-in driver.
Lenovo Support & downloads - Downgrading from certain versions of Windows Vista and Windows 7 to Windows XP
Downgrading from certain versions of Windows Vista and Windows 7 to Windows XP
Lenovo Support & downloads - Downgrading from certain versions of Windows Vista and Windows 7 to Windows XP
Lenovo is providing Windows® XP Professional Recovery media and/or Windows Vista Recovery media as a way to downgrade from certain Windows Vista® or Windows® 7 operating systems running on Lenovo Think PCs.

Eligible operating systems include:

* Microsoft® Windows Vista® Business
* Microsoft® Windows Vista® Ultimate
* Microsoft® Windows® 7 Professional
* Microsoft® Windows® 7 Ultimate

Lenovo customers having a qualified operating system may purchase a Windows XP Recovery CD or Windows Vista Recovery CD by contacting their local Support Center.


Monday, June 07, 2010

How to - place a hit counter on a Blogger or BlogSpot blog

Blogger and BlogSpot are the same thing, a user-friendly blogging platform owned and operated by Google. They recently underwent an upgrade that has seen the introduction of a common interface, so these instructions should work for all users (I hope!).

I did hope there was a counter already set up as a gadget, but there wasn't. I certainly couldn't find it by searching the gadgets for "counter" anyway. So let's just use another gadget - the "HTML/Javascript" one, instead.

First up, though, we need some counter code. You can usually get this from any virtual server hosting company but if you don't have one of those handy there are plenty of options on the web. Beware though as the top 2 on a Google Search for "counter code free" were marked as suspected spammers/crackers or just plain infected sites. You don't want bad code infecting your blog, so respect those warnings if you see 'em.

Anyway I found what appears to be a reputable site and I have tested it out. So far, so good. It offers lots of variations on the hit counter theme and I just chose "whatever" to see if it worked. It did.


Yes, it would work better against a white background but hey, it works ;-)

I got it from Website Hit Counters in the form of a snippet of code. My selected code generates a counter that looks just like this (please don't view source and copy my code, it's specific to my site and won't work for you!!):


web counter


All I had to do was copy and paste that code into the standard HTML/Javascript gadget supplied by Blogger.


So the steps are:

  1. Go to a reputable hit counter maker. If you go to Website Hit Counters they'll ask you to select a style (choose wisely, unlike me). You'll also have to supply a starting count (like zero or something higher if you like) and an email address. They'll email you with stats if you like. There's no other charge
  2. Copy the code that is generated
  3. Go to Blogger and log into your account
  4. Select your blog on your Blogger dashboard
  5. Choose "Design". You'll be presented with "add or arrange page elements" and an overview of your blog design. 
  6. Depending upon the layout of your blog (something you can also change if you like) somewhere on that design will be an option to "add a gadget". Preferably find that option in a good spot - the bottom of your page for example - and click on it
  7. A gadget list will come up - just scroll down to "HTML/Javascript" and click on the "plus" or addition sign to add that gadget
  8. The gadget wants a name but you can ignore that - leave it blank - and just paste your code into the large empty box, then click "save"
  9. It will then save the code on the page! Just click on "view blog" and scroll down to the page bottom (or wherever you chose to put it). Your counter should now be visible.    
  Hope that works for you, too.  

I can help you set up a blog or simple website

Yes, it's easy - very easy. But isn't everything easy once you know how? 

In fact it can look daunting. There are so many options: host locally, or globally? Use Blogger or WordPress? Windows or Unix? US or Aussie domain? A subdomain? What about support? How do I update it? First up I can provide an initial consultation and work with you to refine what you want - and what you really need. My standard $50/hour rate applies for such new consultations - but if you already know what you want - a simple, effective blog or website on a standard platform - then we can skip the deep analysis. 

So if you do want to set up a blog or simple website and just want some help, I can assist with setting it up at my standard rate of $50/hour (or less for repeat business). That's to say that I'll work with you on theme choice, overall design, navigation and basic "how-to" instruction, including FTP if needed. If you have monetisation already (Google AdSense for example) or want to set that up I'll help with that as well. I'll also cap this standard setup at $300 - if your single domain, single blog - using either WordPress or Blogger, with standard themes - or 5 page web site with a standard template theme (from my stock or yours), basic navigation and up to 5 images isn't up and running for that price then I'll keep working on it until it is - no extra charge. To do this and not go broke I have to add just 2 catches...

Catch number 1 - whilst I'll always give you plenty of options and choices they will be on platforms and using tools that I use regularly, already have access to or are freely available. (Which is to say that at this price I'm not going to buy extra hardware or additional software to meet your specific requirements - however I'm happy to quote on such extras!) My blogging platforms of choice are WordPress or Blogger and I have deep experience with both. For most purposes I recommend Blogger but for deeper customisation WordPress will usually give a better result. (It will also take more time to learn on your part, however.) Use either and it'll go smoothly.

Catch number 2 - for this one-off set up fee I don't provide hosting. But this is actually not a problem for most bloggers or simple web sites. You can get basic hosting free or at little cost; or you can source it yourself. If you accept basic hosting on Blogger or a free or near-free web host (WordPress also comes free in some cases) I'll help you with uploading and customisation how-to until the site works as intended. We decide together at the beginning what 'working as intended' means, so that's not a confusion later.

If you want more, including ongoing support, I can help at my ongoing $40/hour rate for regular customers. I also offer a hosting plan using US servers, or can help you with an Aussie based server if you wish - both at extra cost. I'll quote on your needs. I can also host your pages on my own shared virtual servers, using domains and sub-domains I own (but again I'll give you options).


And if you do want all of the bells and whistles - something outside of the ordinary, standard templates - again I'll listen to what you want to do and quote.

Still confused? Let's chat about it.

Saturday, June 05, 2010

Stuck with XP for now? Speed it up!

There are many things you can do to speed up outdated but still perfectly functional operating systems like Windows XP. A hardware refresh is one option, including the most obvious thing - simply add more RAM (the 'random access memory' or short-term memory that a computer uses to load and run a program, as distinct from the non-volatile memory that you store your data on). Of course you may already have enough RAM or just don't want to spend a lot of money, so what else can you do?

There are all-in-one utilities like TuneUp that will do this for you, and there are also inbuilt utilities in the operating system that address each function. It's your choice.

  1. First up, remove software you no longer use - These may accumulate over time and soak up space. If you aren't ever going to use it again (and have a copy of the installation disk or files somewhere, just in case) simply remove it. Go to Control Panel --> Add/Remove Software
  2. Clean your system and make some space - Delete unwanted files and old emails you no longer need via Control Panel --> Internet Options -> Delete Files (always look carefully at what's being deleted just in case but most downloads and old cached files can go)  
  3. Get rid of old cookies. These are hidden Internet browser files that may contain helpful setup information for individual web sites, so be careful - zap only the ones you are sure about. Control Panel --> Internet Options --> Settings --> View Files --> Check and delete the cookies you don't need
  4. Cleanup all other temporary files and empty the recycle bin: go 'start\programs\accessories\system tools\disk cleanup'. That will make some space. Temp files are meant to be, umm, temporary! (Just don't zap things you need.)!
  5. Defragment your hard drive (the non-volatile data storage) Hard drives do a good job of writing and rewriting your data but over time things that should be close together and quicker to get to get stored apart. This restores logic to the filing system. Use the XP tool: 'start\programs\accessories\system tools\disk defragmenter' 
  6. Clean your registry. Not such an easy one and best left for a professional, the experienced or the brave. You can also download a utility to do this. Errors accumulate over time and the registry gets cluttered
  7. Backup unused fonts. These collect over time and can become quite massive if you have loaded many programs. Whatever you do keep the ones you need, especially the "XP Fonts". Back unwanted fonts onto a CD or DVD and store them somewhere.
  8. Get rid of any big desktop background graphics files, consider even unchecking the Windows XP theme (ie go back to the 'old style' or classic Windows - it runs faster). Right-click on a blank part of your desktop and click on 'properties'.
  9. Uncheck all of the system-hogging effects that look cool but slow you down. Look in Control Panel --> System --> Advanced tab --> Performance tab, click Settings --> Uncheck everything
Of course there are loads more options but above are some of the simplest things to do in order to make things faster and delay a hardware upgrade.

Tuesday, May 25, 2010

Gadgets - an RF modulator and some of the components needed to feed your computer a TV signal


Modulator WiFi DTV_0217
Originally uploaded by gtveloce
Here's a pic of an RF modulator sitting on a PC (middle, left). In fact I use the modulator to get an old TV to work with a set-top-box and DVD player. If - like on this TV - you don't even have a composite (or 'yellow video connector') input then you need an RF modulator to send the video signal from the modern output device to ye olde RF connector instead.

It's not ideal but with some mucking around it does work. You will have to tune the TV to the frequency of whatever you hook up and you may get a distorted picture. Alternatively, upgrade to a newer TV with at least a composite input.

Also in the pic is a set-top-box on a stick (middle right). Well it's an HD Digital TV tuner with USB connection. With that little device I can use the PC as a TV and Personal Video Recorder (PVR). With a new-fangled HDMI connection we can easily hook the PC to a TV, too, and use it as a monitor. Or (as I did) we can use older-style connections to pump the signal out to the TV. You may however have to use an adapter to bridge between PC 'D-shell' and yellow composite TV connectors.

Lastly, that's a WiFi USB 'dongle' right up the back.

Monday, May 24, 2010

Audio/video switch


from PC to TV_0484
Originally uploaded by gtveloce
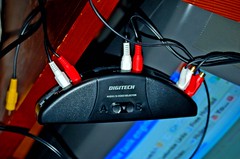
The sort of audio/video switch you can use to switch between 2 devices. The output goes to a 3rd device.

In this example I hooked up the kid's PC to an old composite-only analog TV via a VGA feed (a standard PC video connection) to an analog PVR (or personal video recorder - a box with a hard drive in it).

The sound is sent through a Logitech 5.1 amp/speaker system via a 2-in 1-out switch (pictured) to allow a swap between the DTV-B (digital TV - broadcast) STB's (set top box) audio and the PC audio-out. It works!

That's the audio switch. I could have switched video through it as well but I use the analog PVR to do that and just feed the main stereo audio through here, with the other speakers going direct.

Friday, May 14, 2010

Rob's CC IT Shop is now open

I have partnered with Amazon to bring you a range of quality electronics at decent prices. Bear in mind that some products and/or models are restricted to certain markets and may not be available in Australia, and further that warranties may vary between countries. Note also that $US may be quoted, in which case please ensure you have converted back to your local currency before committing to your purchase. 

Thursday, May 06, 2010

Networking Windows 7 with XP - setting the workgroup name

Here's a tip. Having just updated to Windows 7 I couldn't find where to set my workgroup name (which is the name you set for all computers on your network). Well it's not under Networks in control panel (which is where you might think it should be) but under System instead.

From the Start menu select Control Panel, System; then to the right of "Computer name, domain, and workgroup settings" click Change Settings. You can change your Computer Name here as well, BTW. Click Change settings and the workgroup option (which was greyed out) becomes editable in a dialog box. Set it to whatever workgroup name you use for all your machines (in XP the default was MSHome, I think... in Win7 it's just Workgroup. So it's not going to work out of the box, it just needs some help.)

Tuesday, May 04, 2010

If there's something wrong, please let me know.

I appreciate your business - if there's something amiss in any way please let me know.

Cheers, Rob.

Thanks for your business!

I just wanted to say that I appreciate your business and trust all is well. Let me know if there's anything else I can do to assist - your comments and feedback are always welcome.

Cheers, Rob.

Monday, May 03, 2010

Up and running

The new domain is registered - we are now registered as centralcoastIThelp.com. Not amazingly creative but let me tell you the angst I went through choosing from the available options... not easy.

By the way I registered that domain (as I have done for yonks) via virtualave.net (my web server supplier of choice) and Tucows. May as well own up, if you sign up via that link I'll get a small commission against my web hosting plan. Won't make me rich but helps keep the ship afloat. Same principle applies with any advert you see in this blog.